DIY activity is the best way to teach your kid about shapes and colors. They enjoy doing these activities. It’s a fun and cost-effective way to make your kids learn shapes and colors. Without wasting time let’s jump into the activities.
- 1. Cutting and Pasting Activity on Shapes
- 2. Sorting Activity For Shapes and Colors
- 3. Puzzles Sorting
- 4. Colour the Shapes with Earbuds
- 5. DIY Clay Shape Making
- 6. Forming shapes with Earbuds
- 7. Forming Shapes with Icecream sticks
- 8. DIY Shape Sorting Board
- 9. Puppets With Icecream Sticks
- 10. DIY Shape Sorter
- Download Worksheets
1. Cutting and Pasting Activity on Shapes
Making a house using different shapes

Read More: Why are Shapes Important For Preschoolers? | Free Worksheets
- Take chart papers of different colors – red, green, yellow, and brown.
- Cut out a triangle from the red chart paper (for the roof), two little squares from the brown chart paper ( for windows), a wider rectangle (for the door), two thin rectangles from the brown chart paper ( for trees), two ovals from the green chart paper (for treetops) as shown in the figure.
- Free printable worksheets are available for this activity. You can also make different things like ice cream, grapes, flowers, etc. Please take the printout and give it to your child. Let them do the activity.
2. Sorting Activity For Shapes and Colors
Sorting helps the child to recognize the shapes and colors and it helps to develop the kid’s motor skills.
- Cut small shapes in color paper. On another sheet draw the shapes in a big size. Ask your kid to stick the small piece of shapes in the big ones.
- Draw big shapes in chalk or on a piece of paper. Ask your kid to sort the small shapes and place them on the big ones.
- Ask them to sort the smaller shapes according to their color.
- You can also take paper cups for the sorting activity. Color the paper cups with a particular shape and ask your kid to sort the DIY clay balls of different colors.
3. Puzzles Sorting
Arranging the puzzles in the correct order is a fun way to grasp your child’s interest. Let’s see how to make a DIY puzzle at no cost.
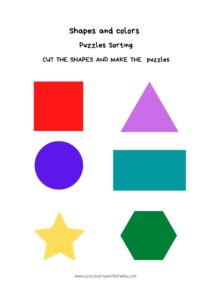
Making DIY puzzles
Take the printout of the shapes. Stick them on box cardboard. Now cut the shapes out of it. You will get particular shapes. Again cut them into four parts. you will get 4 parts of the shapes. Shuffle and give the shapes to the kids. Ask them to arrange the shapes in the correct order.
Free printables of the worksheets are given. Please make use of them to make your work easier.
4. Colour the Shapes with Earbuds
With earbuds, you can create so many activities. Kids love using earbuds in their activities.
- Draw dotted line shapes on a piece of paper.
- Ask your kid to dip the ends of the earbuds with colors and join the dots of the shapes.
5. DIY Clay Shape Making
- Store-bought clays are full of chemicals. Please be with your kid while they are playing with the store-bought clays because there’s a high of putting them in their mouth which is dangerous.
- Making DIY clay is very simple. Mix flour with water. Your DIY clay is ready to use. If you want colored clays, add edible colors to the flour.
- Teach them to make different shapes with this clay. You can also make different shapes of flowers, houses, trains, ice cream, grapes, and rockets.
6. Forming shapes with Earbuds
- Take the printout of the shapes and ask your kids to place it on the shapes.
- Color the ends of the buds. Ask them to join the colors and make shapes.
7. Forming Shapes with Icecream sticks
- Take the printout of the shapes and ask your kid to place it on the shapes.
- Color the sticks and ask your kids to form the shapes with the same color.
8. DIY Shape Sorting Board
- It’s very easy to make a DIY sorting board available in the market.
- Take 2 pieces of box cardboard or thermocol sheets of length 12 inches.
- Color different shapes on one sheet and cut out the shapes. you will have holes in the shapes. This is sheet one.
- Collect some bottle capes and stick them on the shapes.
- Place sheet one on top of sheet two and paste them. You can see, holes are formed in shapes.
- The DIY board is ready to use.
- Ask your kid to place the correct shapes with bottle cape handles on the particular holes.
9. Puppets With Icecream Sticks
- Cut different shapes and pictures.
- Stick it on one side of the stick.
- Your ice cream stick puppets are ready to use.
10. DIY Shape Sorter
Things Needed
- small cardboard box
- color form sheets
- color paper
- paper cutter
- glue
- scissors
Method
- Cover the box with any color paper.
- On each side cut a hole of any shape.
- In a form sheet cut the shapes so that the kids use this for dropping the shapes into the holes in the box.
- The DIY shape sorter is ready to use.
Download Worksheets
Hope u all love the activities. To download the worksheets CLICK HERE.